Verify Smart Contracts
This guide demonstrates several options for verifying smart contracts on Berachain. Contract verification makes your source code publicly available and readable on block explorers, enhancing transparency and trust for users interacting with your contracts.
We'll cover the following verification methods:
- Manual Verification using Berascan - Step-by-step verification through the block explorer interface
- Hardhat Verification - Automated verification using Hardhat's built-in verification tools
- Forge Verification - Verification using Foundry's forge verify command
- Remix Verification - Verification directly from the Remix IDE
Requirements
- An already deployed smart contract
- Access to the contract's source code
- Contract address on Berachain
- Appropriate verification tooling (depending on chosen method)
Need to deploy a contract first?
If you haven't deployed a contract yet, please refer to our Create HelloWorld Contract Using Hardhat or Create ERC-20 Contract Using Foundry guides first.
Manual Verification using Berascan
Step 1 - Navigate to Your Contract
Go to your contract's page on Berascan using your contract address. You can find this by searching for your contract address in the search bar.
Step 2 - Click "Verify and Publish"
On your contract page, look for the "Verify and Publish" link and click it.

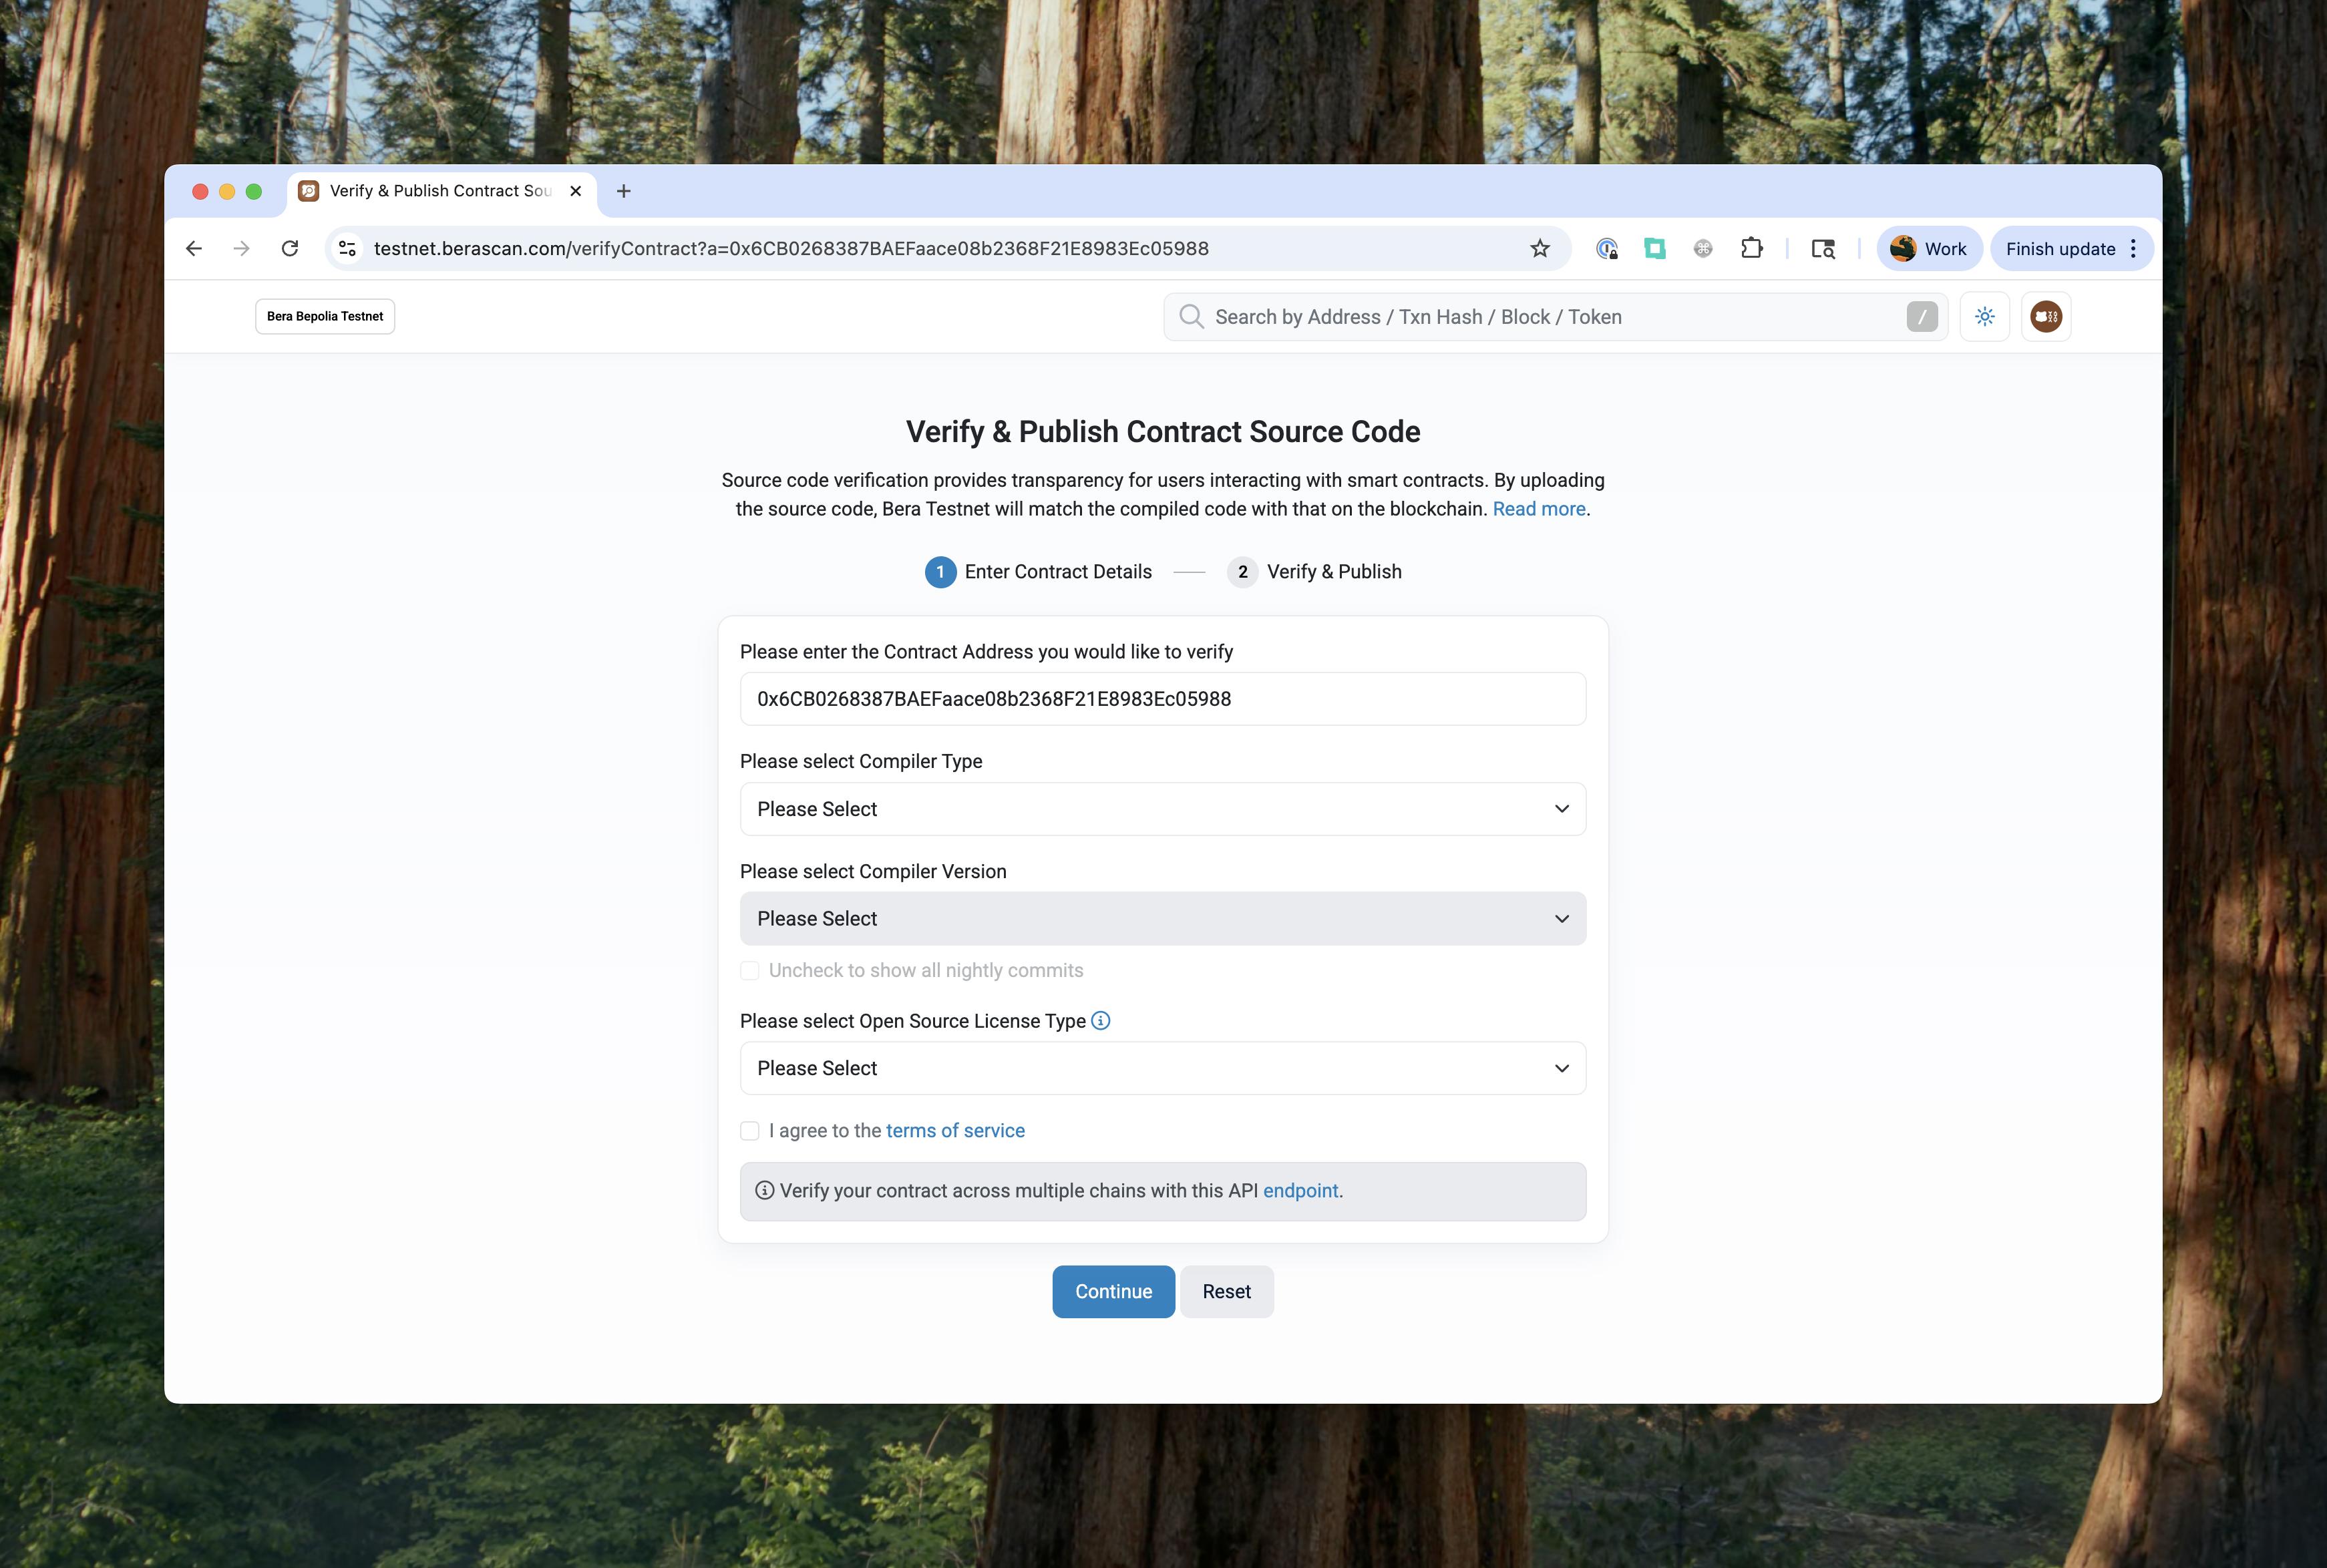
This will take you to the contract verification page at https://testnet.berascan.com/verifyContract.
Step 3 - Enter Contract Details
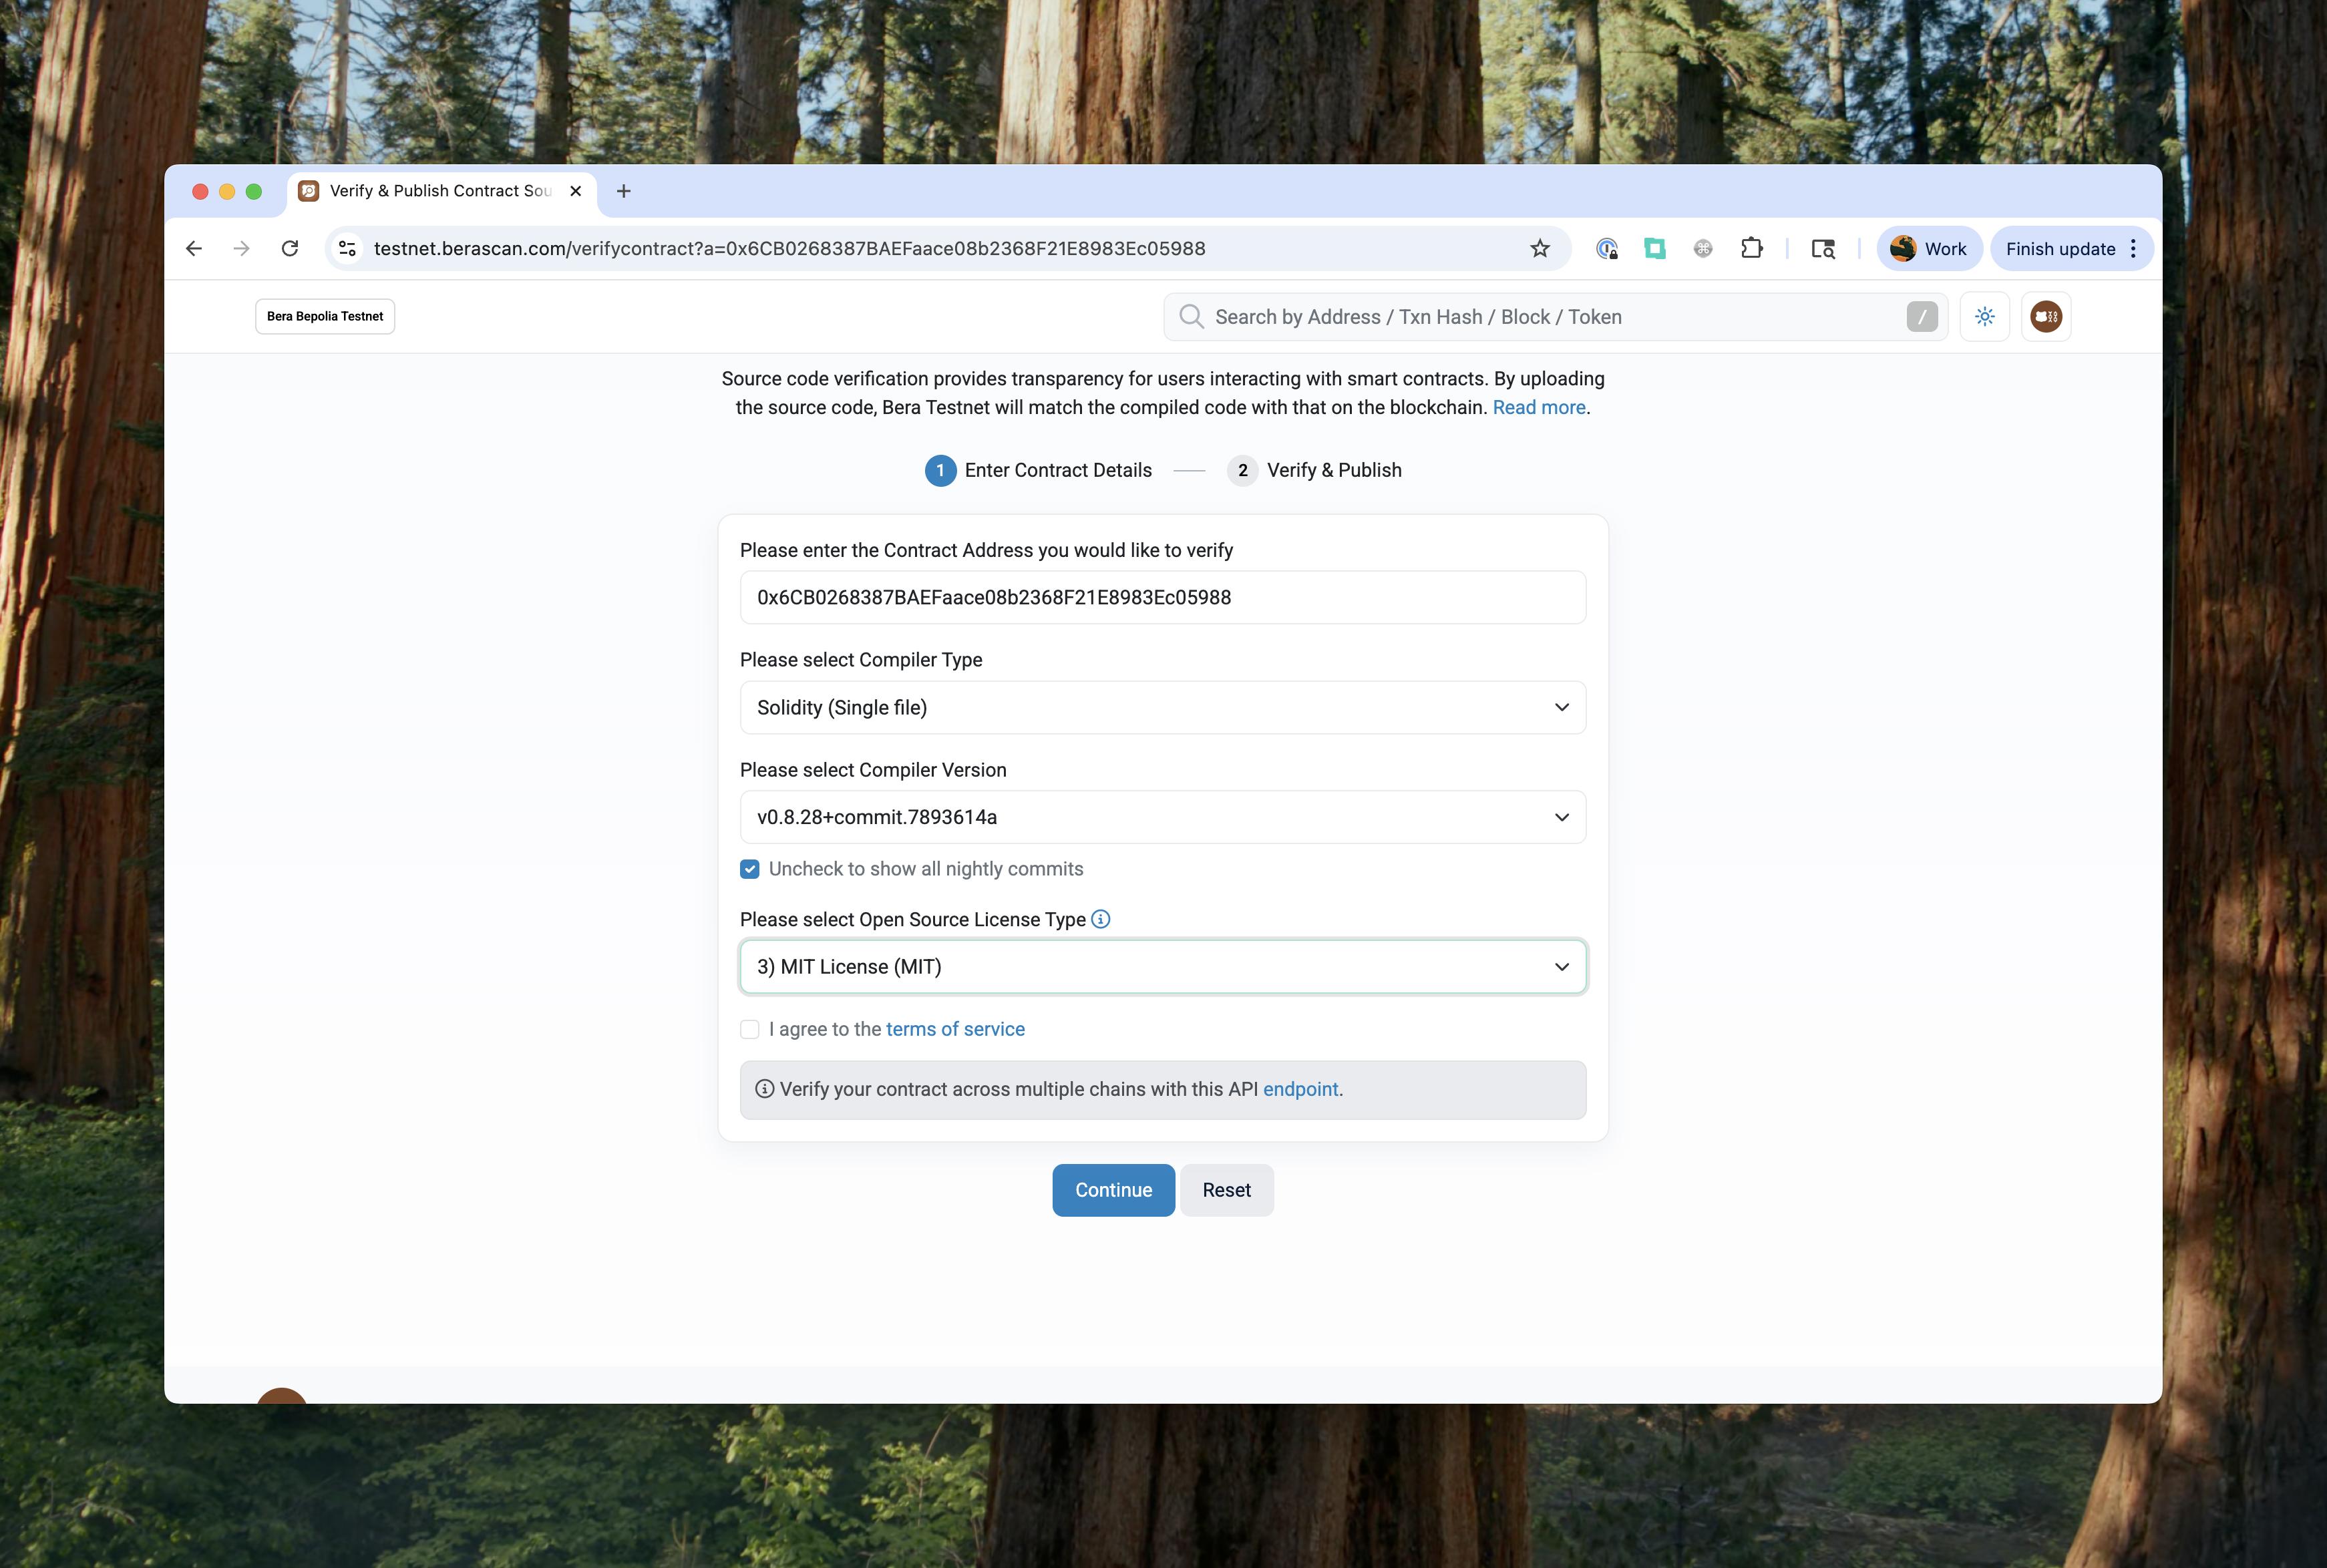
On the verification page, you'll see a form to enter your contract details:
- Contract Address: Enter your deployed contract address (pre-filled in the example)
- Compiler Type: Select "Solidity (Single file)" for flattened contracts
- Compiler Version: Choose the exact compiler version you used for deployment (e.g., v0.8.28+commit.7893614a)
- Open Source License Type: Select the appropriate license (e.g., MIT License)
- Terms of Service: Check the box to agree to the terms of service
- Continue: Click the "Continue" button to proceed to the next step

Using Flattened Contract Files
For contracts with multiple files or dependencies, you can use a flattened contract file with a single file upload. This combines all dependencies into one file, making verification easier.
Step 4 - Upload Contract Source Code
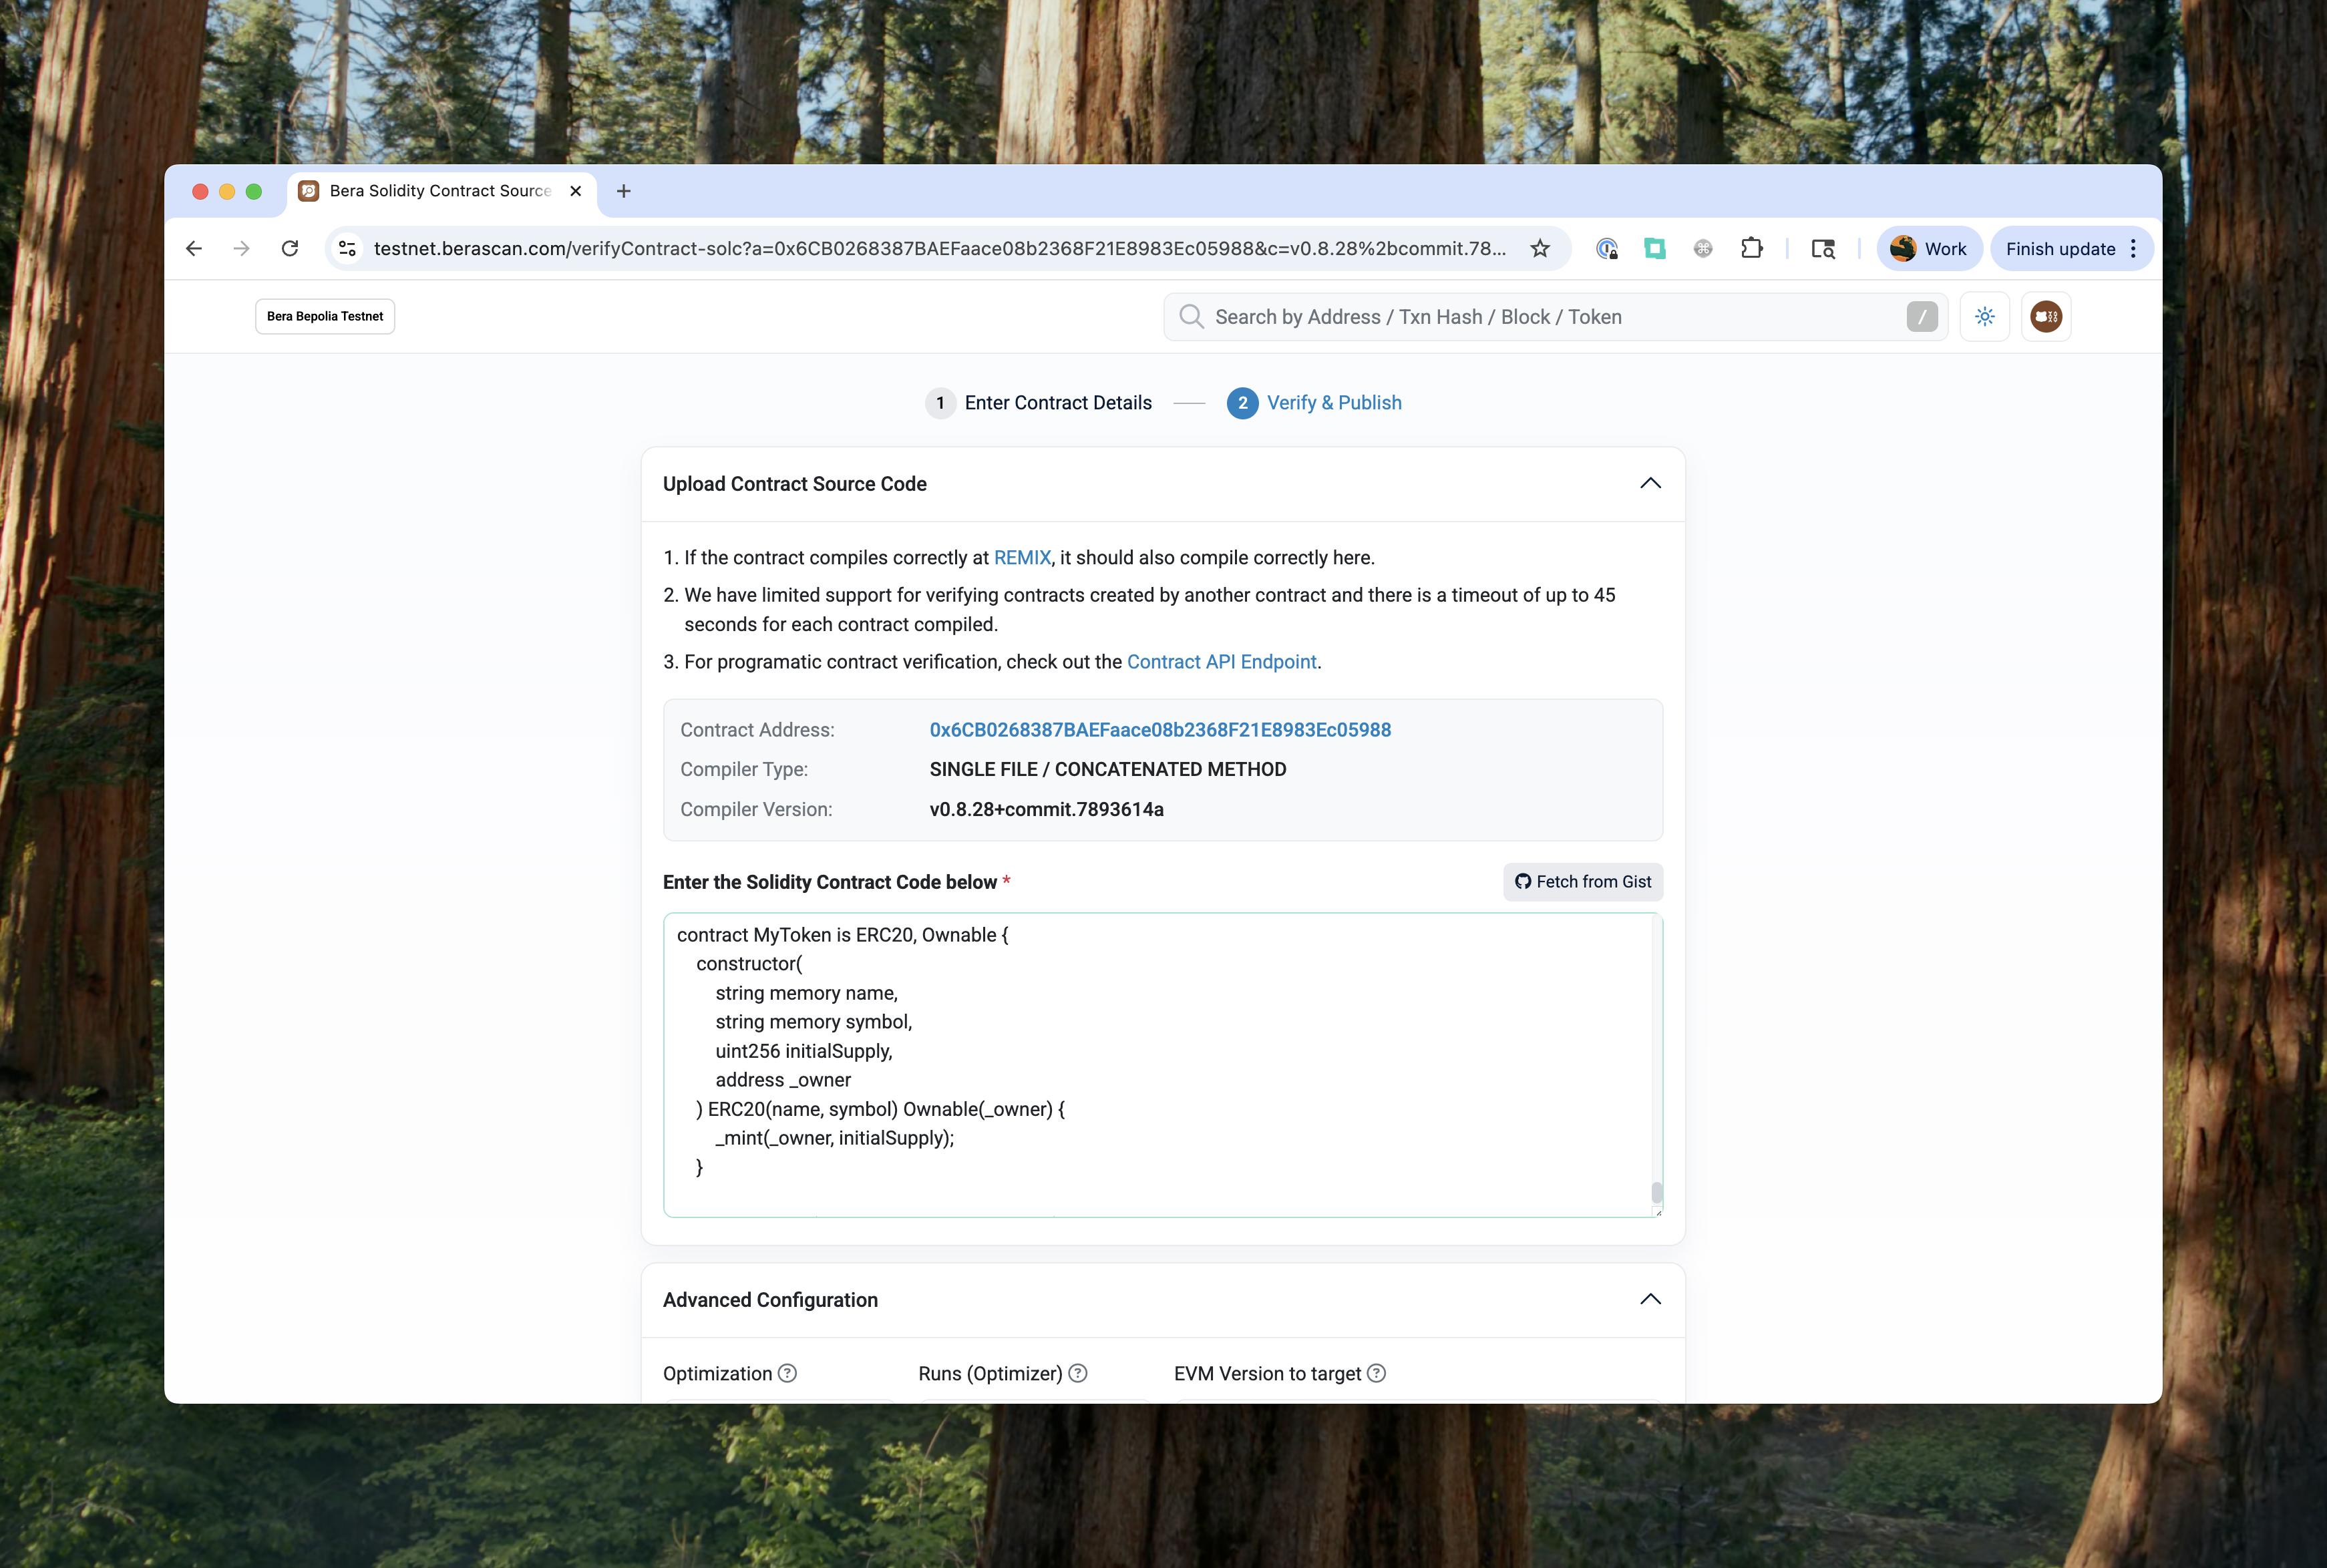
After clicking "Continue", you'll reach the "Verify & Publish" stage where you upload your contract source code:
- Contract Details: The page will display your contract address, compiler type (SINGLE FILE / CONCATENATED METHOD), and compiler version
- Source Code: Paste your flattened contract source code in the text area
- Advanced Configuration: Optionally configure optimization settings, runs, and EVM version
- Submit: Click "Verify & Publish" to submit your contract for verification

Contract Compilation Notes
- If your contract compiles correctly in Remix, it should also compile correctly here
- There's a timeout of up to 45 seconds for each contract compiled
- Limited support is available for contracts created by another contract
Step 5 - Wait for Verification
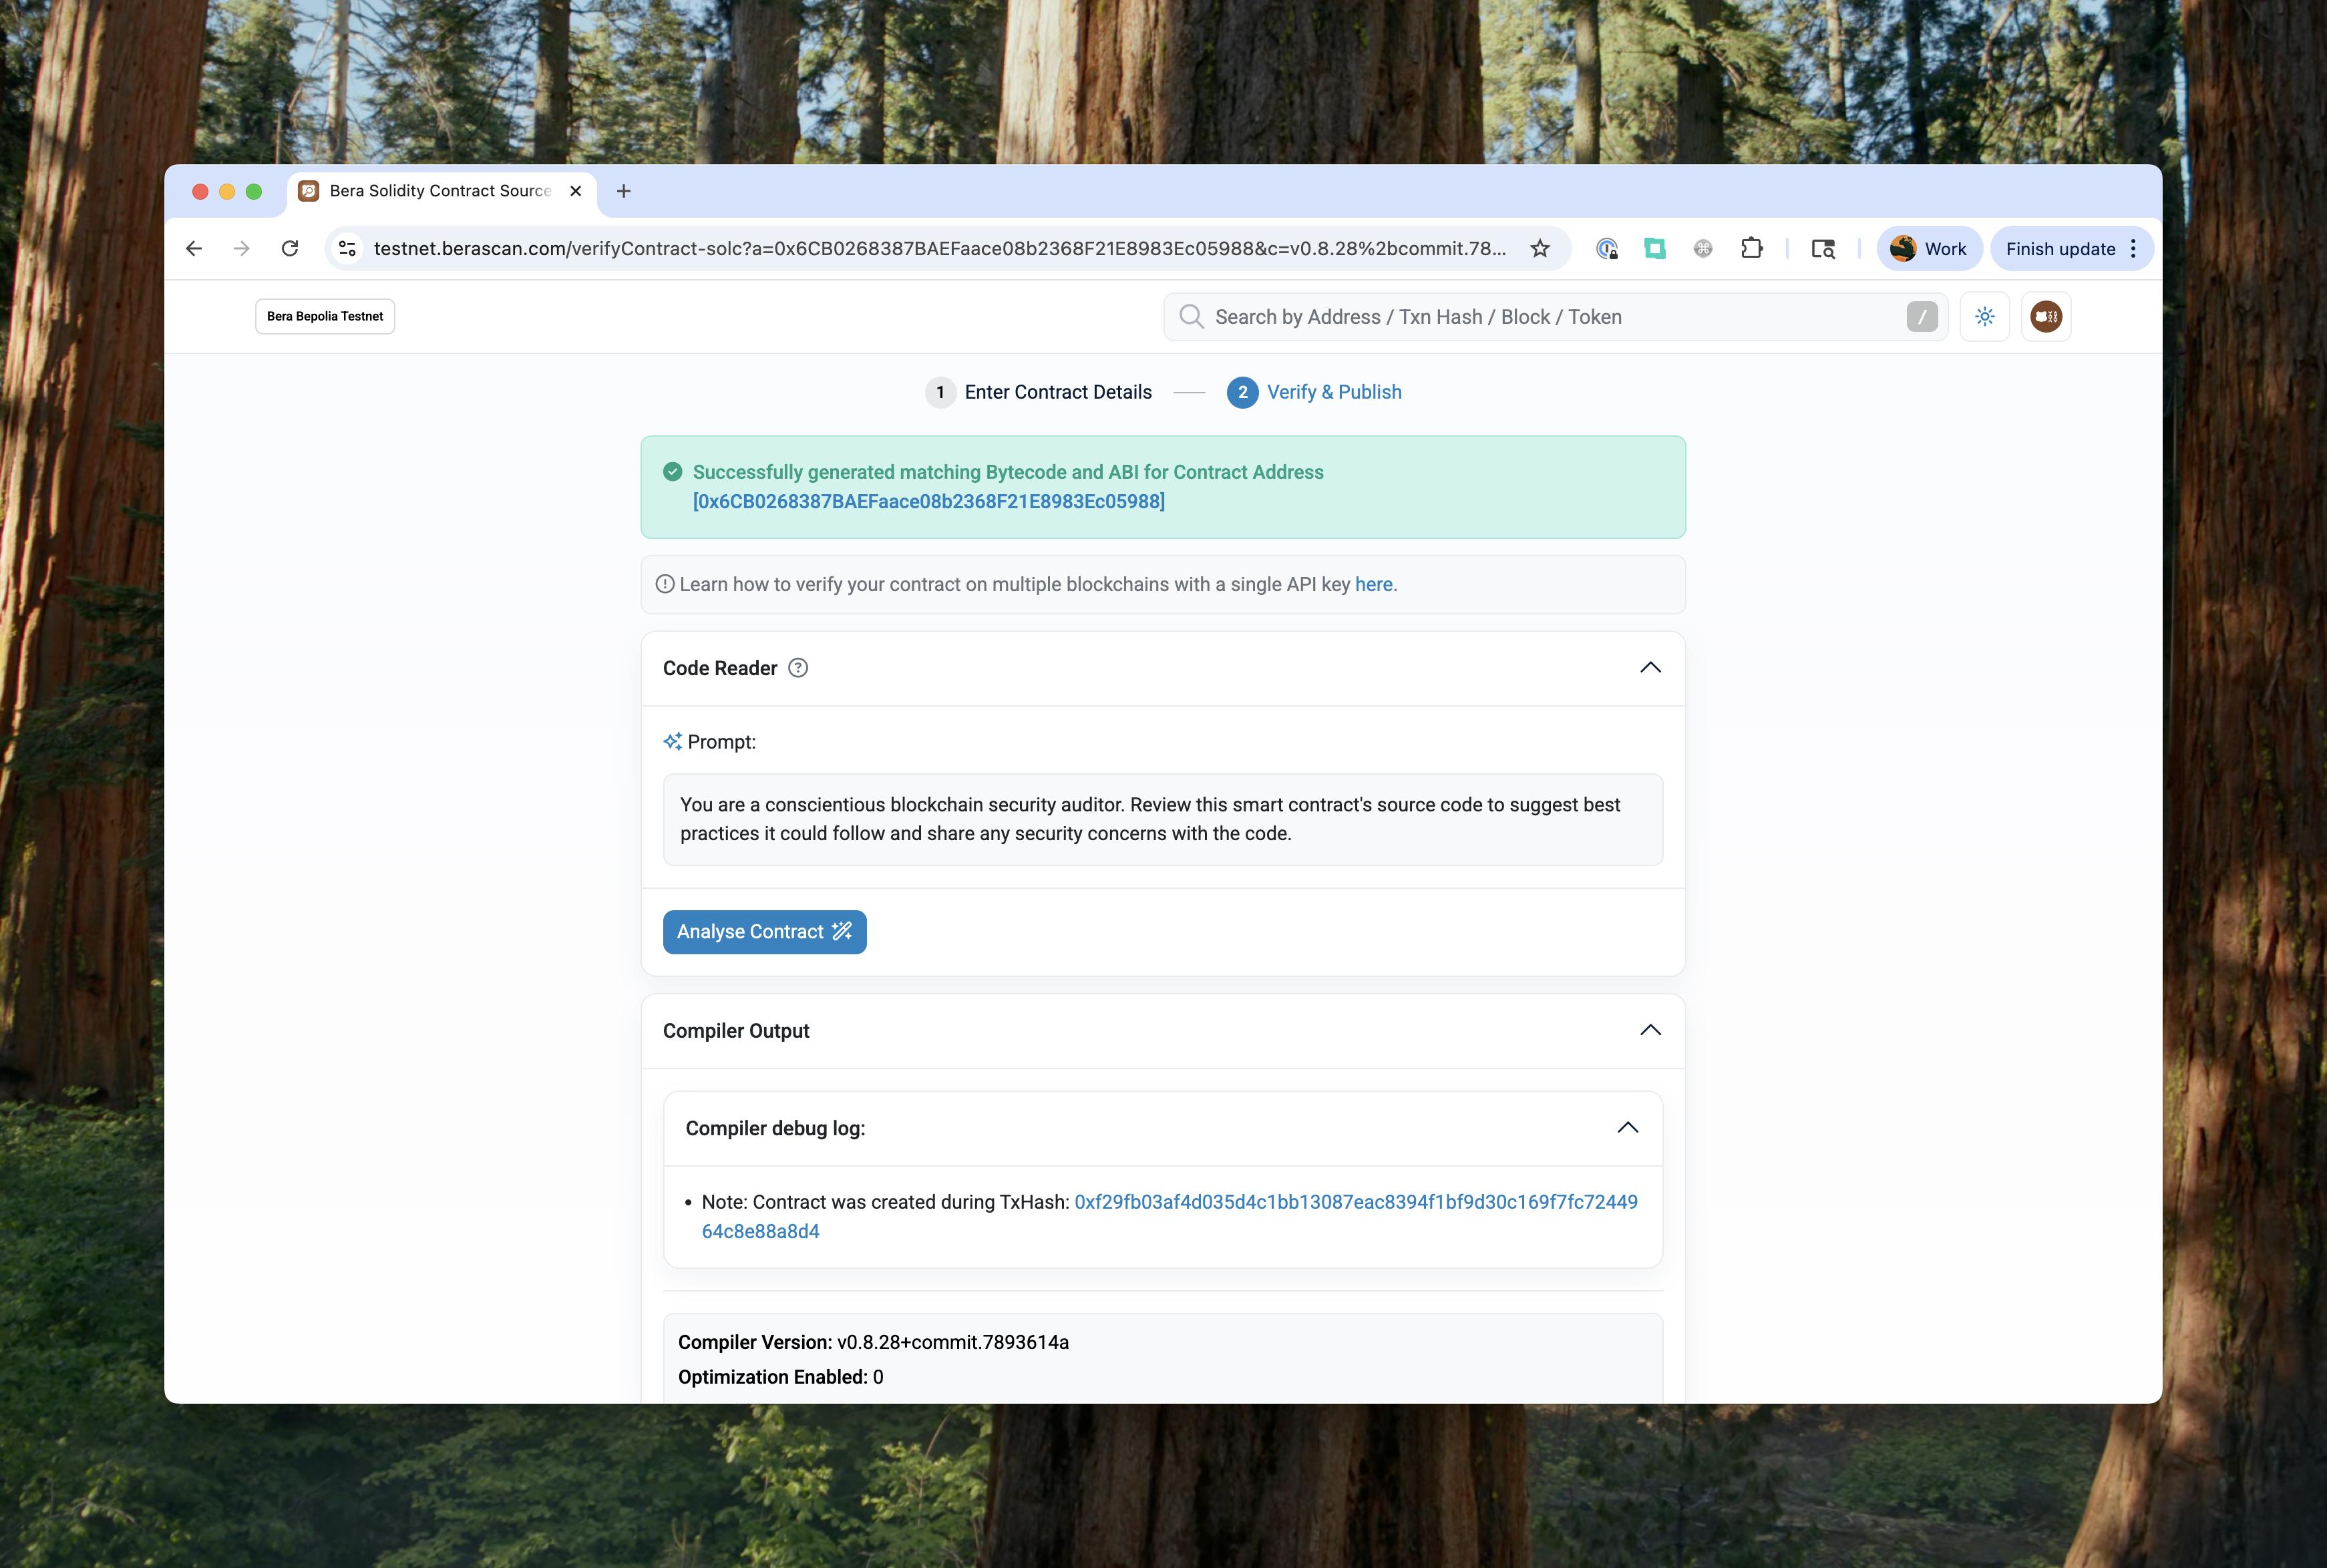
After submission, Berascan will verify your contract. This process usually takes just a few seconds. Once verified, your contract will be publicly readable and you'll be able to interact with it directly through Berascan's interface.

Troubleshooting
If verification fails, check:
- Compiler version matches the one used for deployment
- Source code is complete and unmodified
- Constructor arguments are correct
- Contract address is valid
For additional help, refer to Berascan's verification documentation or contact their support team.
Hardhat Verification
Hardhat provides built-in contract verification capabilities that can automatically verify your contracts after deployment. This method is ideal for developers using Hardhat as their development framework.
Requirements
- Hardhat v3.0.0 or greater
- Etherscan API key (V2 API supports multiple platforms)
- Deployed contract with constructor arguments
Configuration
First, add your Etherscan API key to Hardhat's keystore:
pnpm keystore:set ETHERSCAN_API_KEYNext, configure your hardhat.config.ts to include verification settings:
const config: HardhatUserConfig = {
  // ... other config
  verify: {
    etherscan: {
      apiKey: configVariable("ETHERSCAN_API_KEY"),
    },
  },
  chainDescriptors: {
    80069: {
      name: "Berachain Bepolia",
      blockExplorers: {
        etherscan: {
          name: "Berascan Bepolia",
          url: "https://testnet.berascan.com/",
          apiUrl: "",
        }
      }
    },
  }
};
Verification Command
Add a verification script to your package.json:
{
  "scripts": {
    "verify:berachain": "./node_modules/.bin/hardhat verify --network berachainTestnet --"
  }
}
Then verify your contract:
# Replace with your contract address and constructor arguments
pnpm verify:berachain 0x2ACD9577B57Ff043F0203730683e8c7C881DcB21 "Hello World"
Expected Output
=== Etherscan ===
📤 Submitted source code for verification on Berascan:
  contracts/HelloWorld.sol:HelloWorld
  Address: 0x2ACD9577B57Ff043F0203730683e8c7C881DcB21

⏳ Waiting for verification result...

✅ Contract verified successfully on Berascan!
  contracts/HelloWorld.sol:HelloWorld
  Explorer: https://testnet.berascan.com/address/0x2ACD9577B57Ff043F0203730683e8c7C881DcB21#code
Learn More About Hardhat
For a complete Hardhat development workflow including deployment and verification, see our Create HelloWorld Contract Using Hardhat guide.
Forge Verification
Foundry's forge verify-contract command provides a streamlined way to verify contracts directly from the command line. This method is perfect for developers using Foundry as their development framework.
Requirements
- Foundry v1.3.1 or greater (required for Etherscan V2 API)
- Etherscan API key
- Deployed contract
Verification Command
forge verify-contract \
  --watch \
  --chain  \
  <CONTRACT_ADDRESS> \
  src/YourContract.sol:YourContract \
  --verifier etherscan \
  --etherscan-api-key <YOUR_ETHERSCAN_API_KEY> \
  --constructor-args $(cast abi-encode "constructor(string,string,uint256)" "BingBongToken" "BBT" 5678)
Constructor Arguments
If your contract has constructor parameters, you must include them using the --constructor-args flag. Use cast abi-encode to encode the constructor arguments:
cast abi-encode "constructor(type1,type2,...)" "arg1" "arg2" ...For contracts without constructor parameters, omit the --constructor-args flag entirely.
Expected Output
Start verifying contract `0xYOUR_DEPLOYED_CONTRACT_ADDRESS` deployed on

Submitting verification for [src/BingBongToken.sol:BingBongToken] 0xYOUR_DEPLOYED_CONTRACT_ADDRESS.
Submitted contract for verification:
        Response: `OK`
        GUID: `xtecz3j...`
        URL: https://testnet.berascan.com/address/0xYOUR_DEPLOYED_CONTRACT_ADDRESS

Contract verification status:
Response: `OK`
Details: `Pass - Verified`
Contract successfully verified
Learn More About Foundry
For a complete Foundry development workflow including deployment and verification, see our Create ERC-20 Contract Using Foundry guide.
Remix Verification
Remix IDE provides a dedicated Contract Verification plugin that supports Berachain's block explorers. This method is ideal for developers who prefer a visual interface for contract verification.
Requirements
- Contract deployed on Berachain (public network)
- Contract compiled in Remix IDE
- Constructor parameters (if required during deployment)
- Etherscan API key (for Berascan verification)
Accessing the Plugin
- Open Remix IDE: Navigate to remix.ethereum.org
- Enable Plugin: Go to Plugin Manager and enable the "CONTRACT VERIFICATION" plugin
- Navigate to Plugin: Access the Contract Verification plugin from the sidebar
Verification Services
For Berachain, the plugin supports:
- Berascan (Etherscan-based, requires API key)
- Beratrail (Routescan-based, enabled by default)
Verification Process
- Compile Contract: Ensure your contract is compiled in Remix
- Select Services: Choose which verification services to use (Beratrail is enabled by default, Berascan requires API key)
- Enter Contract Address: Input the deployed contract address
- Constructor Arguments: If your contract has constructor parameters, enter them in the provided text box
- Submit Verification: Click verify to submit your contract for verification
Advanced Features
Proxy Contract Verification
For contracts behind a proxy:
- Check "The deployed contract is behind a proxy" checkbox
- Provide the proxy contract address
- The plugin will verify both the implementation and proxy contracts
Proxy Limitations
Proxy verification is only supported on Berascan (Etherscan-based service).
Settings Configuration
Configure verification services in the Settings page:
- Add Etherscan API keys (mandatory for Berascan verification)
- Configure custom API URLs for verification services
- Settings are stored per chain
Etherscan V2 API
Remix uses the Etherscan V2 API, meaning the same API key works across 50+ different chains, including Berachain for Berascan verification.
Verification Results
- Receipts Page: View verification status and results
- Lookup Page: Check if contracts are verified and download source code
- Status Indicators: Hover over status symbols for detailed information about failed verifications
Official Documentation
For more detailed information about Remix contract verification, visit the official Remix documentation.